RAM Overclocking is a concept where we are pushing our computers memory beyond factory settings to its max stable limits it involves modifying specific parameters such as timings and voltages to allow the modules to operate at greater speeds in order to gain enhanced performance output. however there is a significant risk factor involved in the process.
The speed of RAM, measured in MHz, refers to its data transfer rate. The faster the data transfer rate, the better the RAM’s performance. Successful overclocking can benefits user into blazing memory speeds, seamless multitasking, and the thrill of harnessing raw computational power.
RAM Frequency and Timings
Main function of Random access memory is storing data temporarily that the CPU needs to access quickly. The speed of your RAM, measured in megahertz (MHz), determines how quickly data can be read from or written to the memory.
In ideal scenario high frequency and low timings is what RAM should have, these two factors considered together to determine overall performance. when a memory module operates at a high frequency, it is more difficult to keep it stable. To counter-balance stability challenges at high speeds, memory timings are often increased. Increased latency will reduce the performance and potentially eliminate the gains from a higher frequency, depending on the size of the frequency increase.
AMD Configuration
For this configuration process install your RAM on motherboard and restart your pc in BIOS mode.

Follow the steps below to access the BIOS and configure your RAM:
- Restart your pc in BIOS mode by pressing key to access the BIOS, often times these are either the “F2”, “F10”, “F12” or the “Del” button.
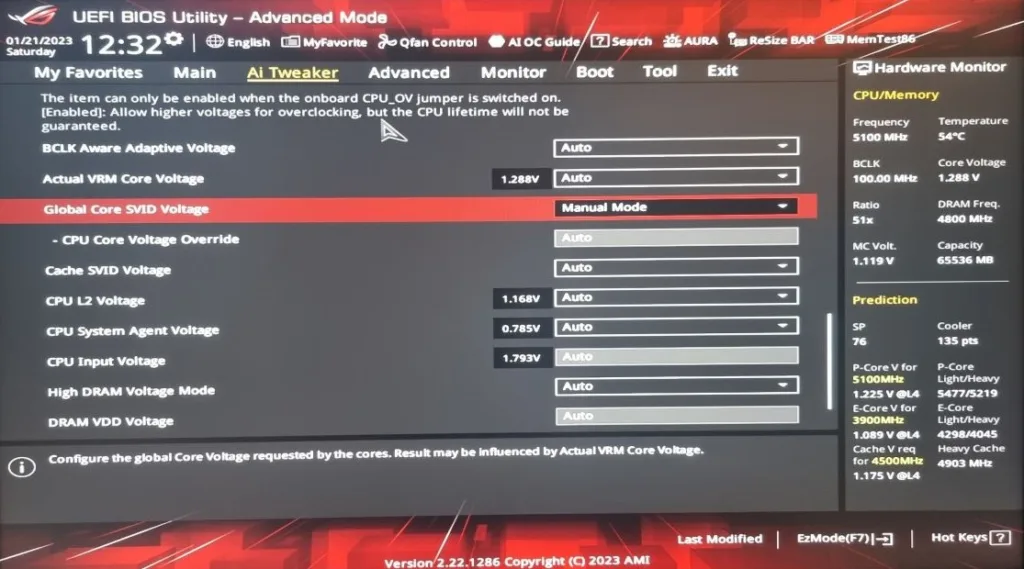
- In AMD BIOS there are two modes available for users one is Easy mode and other is Advance mode here you have to switch to Advance mode by pressing respected key.
- You will need to navigate to the appropriate sub-menu for configuring your memory. Depending on your motherboard make and model, it may be called “Advanced Settings/Mode”, “OC”, “Extreme Tweaker”, “OC Tweaker”, “Ai Tweaker”, “Easy Mode”, or similar.
- There are several options available to select from. Some of the most common options include
- Memory frequency: This option allows you to set the frequency of the memory, which is measured in MHz. The higher the frequency, the faster the memory will operate. However, be aware that not all RAM is capable of running at the highest frequencies, and you may need to experiment to find the best setting for your particular RAM kit.
- Memory timings: This option allows you to set the timing of the memory kit which is measured in a series of numbers such as 5-5-5-15. These numbers represent the time it takes for the RAM to complete various operations, and lower numbers indicate faster timings.
- Memory voltage: This option allows you to set the voltage supplied to the memory. Higher voltage can help the RAM run at higher frequencies or lower timings, but it can also cause the RAM to run hotter and may shorten its lifespan. Be sure to check the specifications for your RAM to see what voltage it is rated for.
- Memory configuration: This option allows you to configure the RAM in single-channel or dual-channel mode, depending on the number of memory “sticks” you have installed on the motherboard. Dual channel mode can improve performance by allowing the memory controller to access two memory sticks simultaneously.
Enabling EXPO or XMP (predefined)
If you want to boost your memory performance, you can use features like AMD Extended Profiles for Overclocking (EXPO) or Extreme Memory Profile (XMP). These are usually built into your motherboard’s chipset already. Depending on the brand of your motherboard and the memory kit you’ve got, you might find these features under different names. For example, ASUS calls it Direct Overclocking Profile (DOCP), MSI has A-Extreme Memory Profile (A-XMP), and Gigabyte offers Extended OverClock Profile (EOCP).
8. You can have stable overclock configuration with these predefined profiles, choose whichever that best suit your needs also you can change it later on.
9. Once you have located the EXPO (or XMP) option, you can enable it by selecting it and saving the changes.
10. To save the changes and restart the system simply press “F10”. (Your system should now boot at the selected EXPO memory speed).
Manual Overclocking
If you are an advance overclocker you might be looking for even more detailed control beyond predefined XMP so making changes manually may be best for you. although its a time consuming process to test with different configurations for having more precise controls. it involves delicately tweaking parameters like memory timings directly from the BIOS to discover a configuration yielding higher speeds, assessing the success of the adjustments, and repeating the process until achieving the optimal balance between maximum stable frequency and the most precise timings.
Keep following points into consideration while tweaking settings
- To stabilize higher frequencies increase or decrease timings, this may require to increase voltage as well.
- For increasing performance at stable frequencies you should reduce (tighten) the timings.
- When aiming for tighter timings, it’s crucial to proceed systematically. Most motherboards offer a diverse range of timings that can be adjusted via the BIOS.
- Following experimentation with memory timings, adjustments to the memory input voltage may be necessary. Similar to CPU overclocking, raising the input voltage of a component will lead to increased energy consumption and greater heat generation.
- Memory voltage is a key ingredient to achieving a stable overclock. In standard memory overclocking case consider 1.5V as maximum. keep voltage values as low as possible when testing.
- some motherboards do not support high voltages so pc will not boot if you keep voltage too high.
- Once a certain frequency is achieved, further increases may not yield better performance because the motherboard automatically adjusts timings to keep the system stable.
- Keep experimentation until you find the right combination of frequencies, voltages, and timings for your hardware.
- Do small incremental changes to any settings until you find right combination.
Remember to save your settings every time you discover a combination that successfully boots and overclocks, even if you plan to continue experimenting for better performance. Keep in mind that not all attempts will succeed, and any modifications made will be lost after an unsuccessful trial.
Tips for Successful RAM Overclocking
While doing overclocking without predefined profiles you have to be very careful. Achieving a successful RAM overclock requires careful attention to detail and patience. Ensure that your system is adequately cooled to prevent overheating, and monitor temperatures closely during the overclocking process. Additionally, be prepared to adjust voltage levels and memory timings as needed to maintain stability.
also checkout below video guide for more information
Conclusion
RAM overclocking can be a valuable tool for optimizing your system’s performance, but it requires careful planning and execution. By understanding the risks and benefits involved, selecting appropriate hardware, and following best practices, you can safely unlock the full potential of your memory modules.
Also checkout our article on Updating your system to Windows 11


